As you may be aware, Microsoft is finally releasing the followup to Windows XP, called Windows Vista, in a few weeks time. As with previous upgrades for Windows, this will create some problems for people who want to upgrade their computers.
When a new version of Windows is released, there are usually some bugs and other issues that need to be ironed out. Microsoft has put Vista through extensive testing, but it is hard for them to test it for every possible situation because there are so many different computer setups and configurations.
If you're thinking about upgrading your computer to Vista when it's released, here are a few things you need to know.
Compatibility
One of the biggest issues with new versions of Windows is compatibility with existing equipment - both in your computer and peripherals like printers and scanners.
Microsoft has tried to keep Vista compatible with all the existing hardware and software out there, but it's just not possible to be 100% compatible and still add new features and capabilities to Windows.
Before you go out and buy Windows Vista, check to make sure all the equipment you use is compatible or the manufacturer offers an upgrade to make it so. Microsoft has a program that will test your system and give you a report on its compatibility, or you can check with the various manufacturers directly.
Scanner are something that are particularly tricky when upgrading Windows so if you use a scanner, double-check that there is Vista compatible software available for it.
Specifications
If you've bought your computer in the last year or so, it should have plenty of power to run Vista. If it's older than a year, you may need to add some upgrades to bring it up to speed.
The following are the official requirements for Vista Premium Edition (the most complete version):
- 1GHz or higher processor
- 1GB RAM
- 40GB or larger hard drive
- Sound card
- Internet connection
- DVD drive
Most of those requirements are not going to be an issue for a reasonable recent computer, but the RAM is one thing you may need to upgrade. Even today, many computers include 512MB or even 256MB which is not enough to run Vista effectively.
Upgrading vs Preinstalled
Upgrading to a new version of Windows is always more problematic than starting with it preinstalled. There are almost always little glitches that need to be sorted out afterwards.
If you're thinking of buying a new computer now and upgrading to Vista when it's released, I would recommend waiting until you can get one with it preinstalled if at all possible. You'll be happier in the long run, in spite of having to wait a little longer.
If you're upgrading an older computer, and you have all the necessary requirements, the most important (critical!) thing is to back up all your important information before starting the upgrade.
The upgrade is not supposed to affect anything that's on your computer - only Windows - but there is always a chance that something doesn't work the way it should. If you get halfway through the upgrade and something goes wrong, you may not be able to load either Vista or your old version of Windows.
This may mean you have to reload your computer from scratch, which could wipe out all your files and information. Make sure you have an up-to-date copy of it all before you start the upgrade.
Showing posts with label computer upgrades. Show all posts
Showing posts with label computer upgrades. Show all posts
Monday, December 29, 2008
Sunday, December 28, 2008
Recognize And Understand Home Networking Components
If you have not decided already,you will soon want to network your two or more computers in your home. You want to be armed to the teach with knowledge of just what it takes to connect your computers to one another.
You first should decide which network is best your you. If your computers are in the same room,the Wireless network should not be considered.The wired by cable network should work just fine.
Computer that may be close to each other but cannot be seen may and have phone jacks close by can easily be networked with the HomePNA Network.While PCs that are far from each other can be connected with the powerline network,assuming wall outlets are nearby.
And when there are computers in different rooms and you want the convenience of moving the systems from room to room,the more expensive Wireless Network is the way to go.After you decide on the type of network that is best for you,knowing what components you'll need to purchase will be a great help.Let's take a look at each network and the components needed to get it up and running.
The WIRED ETHERNET NETWORK
If your computers are in the same room,the basic network kit can wire your systems together.Be sure to carefully open any kit or component you purchase and do not damage the box it came in.The purpose for this is to make it easy to return the component if needed.
Basic kits will have instructions and software for the network as seen as two NICs.Better known as Network Interface Cards,these NICs are installed in empty slots in the system unit.The PCI slot is where the card is installed and there are the USB adapters as well.The network will need cabling to connect the computers and the CAT 5 or Category 5 cable is the one to look for.
Ethernet networks come in two speeds,which are 10 and 100mbps or megabits per second.The wired network will also need a Hub or a Switch to direct traffic from each system.If you want fast traffic,and who don't,you will want to connect a Switch instead of a Hub.If you want all PCs to connect to the Internet,most kits come with Special Bridging Software which links the systems together.
The WIRELESS HOME NETWORK
Wireless networks rely on radio frequency to transmit and receive data.Wireless network equipment will offer you the choice of both wired and wireless connections.
If your computers are in direct line of each other,the IR or Infrared frequency can be used.But most wireless networks now use the Radio Transceiver technology with computers being located just about anywhere.
You will need a Wireless Router to connect each PC to the network.Wireless NIC Cards must be installed in each computer in the network.When you purchase your wireless kit,take note of the indoor range.
As you can see when looking at the wireless Router,you have the option to wire your computers together should something go wrong with any wireless component.Take note of the difference between the wired nic and the wireless nic cards.
The POWERLINE NETWORK
The powerline network uses the electrical wiring in your home to transfer data to and from each computer.Present powerline networks run between 50kbps or Kilobits Per Second and 350kbps.
This network has a drawback in back it will have lots of electrical noise which will cause the network to lose speed.And other PC users can snoop in your computer if they know how.
This network will need a Router for data transfer and nic cards for each system.A Bridge will be needed for access to the internet.These Bridges can be used with your Router.
The PHONELINE NETWORK
The components you will need in the Home Network are close to that of the Wireless network.In most cases,the 10mbps speed network is fast enough for home users.
The computers are connected with a Switch,a gateway,or Router to share Internet access and to send data to each computer through the phone line network.This network is considered the easiest to setup.
Phoneline Network adapters are installed in each PC. The USB or Universal Seriel Bus port connection is the most commonly used adapter for Phoneline networks.To reduce line noise,a Phone Filter may be needed.If you plan to connect a phone and line in one phone jack.you will have to invest in a Line Splitter.Be sure each computer in the network are close to a phone jack.
The Phoneline Network is thought to be less expensive .more dependable and faster when compared with the Powerline network.
In a nutshell,all networks will need some type of adapter inserted in the computer.Each network will need a hub, switch,or router to transfer data.Windows 98,Me,and XP will have the needed software to make everything work together.Adapters and and other hardware will come with device driver software which enables the hardware to talk to the computer.
We have taken a brief look at the hardware needed to network two or more computers.Connecting the hardware was rather simple when we networked our computers using the wireless technology.Learn all you can about PC networking and you will be grateful in having this knowledge should you experience computer problems.
Since we have seen basic network components,its time to see how each component is installed and connected.Then we're going to see how to move data from one machine to the other and share the internet using broadband with a DSL or a Cable modem.Remember to enjoy learning about your computer by performing as many tasks as you can without causing damage to your system.
Friday, December 26, 2008
DIY PC Build - PC Assembly Made Easy
DIY PC Assembly Steps
When you have the new PC components items available, next step is to Assemble the PC together. This is the most interesting part and also the most rewarding part when your system is up and running, all credits to Yourself!!
Essential Tools required:
1) A screwdriver (Cross-shaped)
Optional Recommended Items:
1) Torchlight (To illuminate hard to see areas)
2) Antistatic wrist strap (To discharge of any static charges)
Let¡¯s start now. Firstly, discharge yourself of any static charges by touching the metal casing or attaching the other side of the antistatic wrist strap to the metal casing.
1) Open the case
2) Install the motherboard
Find the motherboard standoffs that should have come with the case. Insert the I/O Shield that came with your motherboard.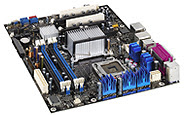 Now locate the screw holes on your motherboard and find the corresponding holes on the motherboard plate (or tray) in the case. Put a standoff in each of these holes on the tray and position the motherboard so that you can see the holes in the top of the standoffs through the screw holes in the motherboard. Now fasten a screw through each of the motherboard screw holes into the standoffs underneath. These screws should be snug but not tight. With the motherboard in, we are now able to start adding in other components.
3) Install the CPU.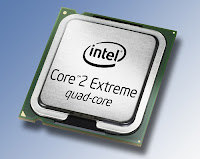
As I mentioned earlier, the processor (CPU) and motherboard go hand-in-hand, so you should spend some time planning and researching what you really desires and buy compatible CPU / motherboard components, just like the importance of buying the right shoe size for yourself. Given that this is a minimum system upgrade, you are saving up quite a bit through reusing other components; I suggest you build a better performing system so that it can serve you for several years to come.
Before start, please read the manual provided with the motherboard/CPU carefully, understand the different parts, and the installation diagrams before proceeding. Then again, it is not very difficult with only 3 simple steps to success.
1st step to success: Install the CPU
I will be using Intel Socket 775 as illustration as it is the latest socket used so far.
-Remove the protective socket on the new socket protecting the pins
-Open the lever and lift up the metal flap so as to install the CPU
-While carefully holding the CPU at the edges, look for the notch in the corner and match it up with the socket. Slowly lay down the CPU in the socket, before lowering the metal flap, and closing the socket lever to secure the CPU.
2nd step to success: Install the CPU heatsink
If you like to go to a cool place to enjoy some aircon when you are hot, the same can be said of the CPU which you have just installed. We need to dissipate the high heat generated by the CPU so that it would not overheat and fry.
-I am recommending getting hold of some thermal paste which you can apply evenly on the CPU surface for better heat conductivity and dissipation. (To note: Intel? boxed processor already come with their integrated thermal solutions, and so does not need extra efforts)
-Align heat sink onto the Socket containing the CPU, with the fan cable orientated closest to fan power connector, and check for any entanglement.
-Press down on fastener caps with thumb to install and lock. Repeat with the other 3 fasteners.
3rd step to success: Power up the heat sink
This is done by connecting the fan cable from step 2 to the CPU_FAN connector located on the motherboard, which is located very close to the CPU. Tie up excess cable to prevent interference with fan operation or other components.
Congrats, by the time you finished this, the rest should be a breeze already =)
4) Install the Memory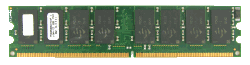
With a new motherboard and faster processor, we will then need more RAM (random access memory) to enable and facilitate this faster performance. Again, you should spend some time planning and researching on memory which is compatible with the new CPU and motherboard you have installed to bring out the best overall performance. To install the RAM modules, you need to unfasten the clips located on each side of the memory slot. Align the RAM module in the socket, such as to match the indent located on the memory chip and the memory slot, for the right facing direction. Push down on the memory module until both clips refasten and a click sound is heard. To change memory, simply press down the both clips at the same time, and the RAM will come out easily.
TIP: Start adding RAM at the slot labeled ¡°Bank 0¡± or ¡°DIMM 1¡±. If you don¡¯t, the system will think there is no memory available and wont boot.
TIP:For newer systems supporting hyper treading technology, you are encouraged to use the dual channel memory functionality by placing 2 sticks of the same memory on alternate slots (i.e.: slot 1 & 3 or Slot 2 & 4, often differentiated by color as well. ) This has been proven to enhance the performance as well.
After installing the new motherboard / CPU, and memory, you are already DONE installing the New essential items you have bought. YEAH!! Now that is left is to migrate the remaining items from the old pc to your "Brand New" PC. =)
5) Install the Power Supply
There will be a bracket at the top of the case where you can mount the power supply, and secure the power supply using screws. The power supply will consists of the following connectors: ATX power connector, ATX_12V connector, IDE power connector, and FDD power connector. Look for the 20 or 24 pin ATX power connector, and plug it into the motherboard allocated power slot. There may also be an additional four or eight pin power lead on the motherboard that needs to be plugged in, which is usually located near the processor socket. Do double confirm with the motherboard manual for details.
TIP: You might want to consider getting a new power supply which rating is at least 300W so as to support any future upgrades you have in mind.
TIP: You need to select the right power supply settings (115v or 220v) depending on your country settings. For newer power supplies, it is equipped with automatic detection, so that will not be an issue at all.
6) Install the Floppy drives/Hard-disks/DVD writers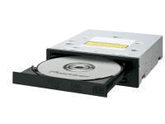
Floppy disks, Harddisks and DVD ROM/writers communicate with the CPU through data cables commonly called FDD/IDE cables, although newer harddisks now connect via SATA cables for faster data communications.
Note: FDD Cable for floppy disk drives appears smaller and has fewer wires.
Note: Using multiple hard disks If you have intention on using multiple hard disks, you must adjust the settings on the multiple disks to inform the computer system which is the main disk and the other supporting/additional disks. If not done properly, the system can get confused, and the disk may not boot at all. Do read the simple instructions as shown on the harddisk surface for the right way to place the jumpers so as to distinguish between the master drive (main operating system) and the slave drives (other files/documents). This instruction varies across different harddisk manufacturers. This configuration should be done before inserting the IDE cables.
First, remove the front casing of the computer, and remove the 5.25" plate so a s to expose the front of the DVD drives later. Similarly do it for the floppy drive plate. Insert the IDE cables into the floppy drive/ harddisk/ DVD data connector noting the orientation of the notch in the centre, so as to insert in the right directions. The remaining connector is to be connected to the motherboard. Next, to power up the drives by plugging in the 4 pin molex power connector from the power supply in step 5 into each hard drive and optical drive. For the floppy drive, the power plug is also 4 pins in a row but significantly smaller than that of the hard disk. Need to take note of the power connector orientation as well.
Final securing all disks and optical drives with screws before securing back the front casing cover.
TIP: Recommend that the IDE hard disk be connected to the IDE 1 connector and the optical devices connect to the IDE 2 connector. Maximum of 2 IDE devices per IDE connector. If using multiple IDE hard drives, you should enter BIOS later on and set their boot sequence accordingly.
7) Install the Video Card
For older motherboards, we typically see AGP video card being used, which will be installed onto the AGP socket, which is often brown in color. For newer systems, PCI Express video cards are more commonly used due to better data transfer performance and better resolution performance. Both AGP and PCI Express slots can be identified easily, and is usually located adjacent to the CPU unit.
Now, insert the card into the slot with some force, and check that it is fully inserted with no protruding edges, before screwing it in at the top of the metal bracket. If it has a power connector, connect it with a 4-pin molex connector.
8) Remaining Internal Connections
-Connect the audio cable from the DVD to the motherboard CD_IN connector (if required)
-Connect the power/reset buttons, and signal indicators (those external blinking lights) to the F_Panel connector on the motherboard. (i.e: Power indicator, hardware indicator, internal speaker, etc...). Read individual motherboard manual for clearer inserting of these signal connectors.
-Double check on proper power connection to all hardware components
- (Optional) Install extra items such as front mounted USB, firewire and/or sound ports.
At this point We are 90% done with our DIY PC Assembly already !! Do not put back the casing covers as yet.
9) Final External Connections
-Connect back the outer devices including items like
a) Keyboard
b) Mouse
c) Monitor
d) Printer / Scanners
e) Speakers
f) External power supply cable
10) Bring on the POWER!!
This brings us to the last stage of the PC assembly process. If you have done everything right, now is the time to sit back and savor the fruit of success.
With the casing still open, and all external peripherals connected, turn on the computer and observe for any abnormality such as fan not spinning, or beeps alarms from the PC. If so, turn off the power and spend some time checking through the connections, and also the manual for some tips on troubleshooting.
Well, if you observed no abnormality till far, and you have seen the splash screen from the motherboard, CONGRATULATIONS!! You have succeeded in building your own PC in this PC Assembly DIY guide by flashG.
Next step is to
-----------------------------------------------------------------------------------------------
In this tutorial, I have shared with you valuable insights on building your own PC with minimum upgrades, so that you can customize your PC to your needs and still keep it very affordable. I have also showed you in details on the installation of various pc components, and I hope you find it informational and useful in helping you with a headstart.
With knowledge comes power, and I hope you are now Very Motivated to start your own DIY PC Assembly in the comfort of your own home. =)

When you have the new PC components items available, next step is to Assemble the PC together. This is the most interesting part and also the most rewarding part when your system is up and running, all credits to Yourself!!
Essential Tools required:

1) A screwdriver (Cross-shaped)
Optional Recommended Items:
1) Torchlight (To illuminate hard to see areas)
2) Antistatic wrist strap (To discharge of any static charges)
Let¡¯s start now. Firstly, discharge yourself of any static charges by touching the
 metal casing or attaching the other side of the antistatic wrist strap to the metal casing.
1) Open the case
2) Install the motherboard
Find the motherboard standoffs that should have come with the case. Insert the I/O Shield that came with your motherboard.
 Now locate the screw holes on your motherboard and find the corresponding holes on the motherboard plate (or tray) in the case. Put a standoff in each of these holes on the tray and position the motherboard so that you can see the holes in the top of the standoffs through the screw holes in the motherboard. Now fasten a screw through each of the motherboard screw holes into the standoffs underneath. These screws should be snug but not tight. With the motherboard in, we are now able to start adding in other components.
3) Install the CPU.

As I mentioned earlier, the processor (CPU) and motherboard go hand-in-hand, so you should spend some time planning and researching what you really desires and buy compatible CPU / motherboard components, just like the importance of buying the right shoe size for yourself. Given that this is a minimum system upgrade, you are saving up quite a bit through reusing other components; I suggest you build a better performing system so that it can serve you for several years to come.
Before start, please read the manual provided with the motherboard/CPU carefully, understand the different parts, and the installation diagrams before proceeding. Then again, it is not very difficult with only 3 simple steps to success.
1st step to success: Install the CPU
I will be using Intel Socket 775 as illustration as it is the latest socket used so far.
-Remove the protective socket on the new socket protecting the pins
-Open the lever and lift up the metal flap so as to install the CPU
-While carefully holding the CPU at the edges, look for the notch in the corner and match it up with the socket. Slowly lay down the CPU in the socket, before lowering the metal flap, and closing the socket lever to secure the CPU.
2nd step to success: Install the CPU heatsink
If you like to go to a cool place to enjoy some aircon when you are hot, the same can be said of the CPU which you have just installed. We need to dissipate the high heat generated by the CPU so that it would not overheat and fry.
-I am recommending getting hold of some thermal paste which you can apply evenly on the CPU surface for better heat conductivity and dissipation. (To note: Intel? boxed processor already come with their integrated thermal solutions, and so does not need extra efforts)
-Align heat sink onto the Socket containing the CPU, with the fan cable orientated closest to fan power connector, and check for any entanglement.
-Press down on fastener caps with thumb to install and lock. Repeat with the other 3 fasteners.
3rd step to success: Power up the heat sink
This is done by connecting the fan cable from step 2 to the CPU_FAN connector located on the motherboard, which is located very close to the CPU. Tie up excess cable to prevent interference with fan operation or other components.
Congrats, by the time you finished this, the rest should be a breeze already =)
4) Install the Memory

With a new motherboard and faster processor, we will then need more RAM (random access memory) to enable and facilitate this faster performance. Again, you should spend some time planning and researching on memory which is compatible with the new CPU and motherboard you have installed to bring out the best overall performance. To install the RAM modules, you need to unfasten the clips located on each side of the memory slot. Align the RAM module in the socket, such as to match the indent located on the memory chip and the memory slot, for the right facing direction. Push down on the memory module until both clips refasten and a click sound is heard. To change memory, simply press down the both clips at the same time, and the RAM will come out easily.
TIP: Start adding RAM at the slot labeled ¡°Bank 0¡± or ¡°DIMM 1¡±. If you don¡¯t, the system will think there is no memory available and wont boot.
TIP:For newer systems supporting hyper treading technology, you are encouraged to use the dual channel memory functionality by placing 2 sticks of the same memory on alternate slots (i.e.: slot 1 & 3 or Slot 2 & 4, often differentiated by color as well. ) This has been proven to enhance the performance as well.
After installing the new motherboard / CPU, and memory, you are already DONE installing the New essential items you have bought. YEAH!! Now that is left is to migrate the remaining items from the old pc to your "Brand New" PC. =)
5) Install the Power Supply

There will be a bracket at the top of the case where you can mount the power supply, and secure the power supply using screws. The power supply will consists of the following connectors: ATX power connector, ATX_12V connector, IDE power connector, and FDD power connector. Look for the 20 or 24 pin ATX power connector, and plug it into the motherboard allocated power slot. There may also be an additional four or eight pin power lead on the motherboard that needs to be plugged in, which is usually located near the processor socket. Do double confirm with the motherboard manual for details.
TIP: You might want to consider getting a new power supply which rating is at least 300W so as to support any future upgrades you have in mind.
TIP: You need to select the right power supply settings (115v or 220v) depending on your country settings. For newer power supplies, it is equipped with automatic detection, so that will not be an issue at all.
6) Install the Floppy drives/Hard-disks/DVD writers

Floppy disks, Harddisks and DVD ROM/writers communicate with the CPU through data cables commonly called FDD/IDE cables, although newer harddisks now connect via SATA cables for faster data communications.
Note: FDD Cable for floppy disk drives appears smaller and has fewer wires.
Note: Using multiple hard disks If you have intention on using multiple hard disks, you must adjust the settings on the multiple disks to inform the computer system which is the main disk and the other supporting/additional disks. If not done properly, the system can get confused, and the disk may not boot at all. Do read the simple instructions as shown on the harddisk surface for the right way to place the jumpers so as to distinguish between the master drive (main operating system) and the slave drives (other files/documents). This instruction varies across different harddisk manufacturers. This configuration should be done before inserting the IDE cables.
First, remove the front casing of the computer, and remove the 5.25" plate so a
 s to expose the front of the DVD drives later. Similarly do it for the floppy drive plate. Insert the IDE cables into the floppy drive/ harddisk/ DVD data connector noting the orientation of the notch in the centre, so as to insert in the right directions. The remaining connector is to be connected to the motherboard. Next, to power up the drives by plugging in the 4 pin molex power connector from the power supply in step 5 into each hard drive and optical drive. For the floppy drive, the power plug is also 4 pins in a row but significantly smaller than that of the hard disk. Need to take note of the power connector orientation as well.
Final securing all disks and optical drives with screws before securing back the front casing cover.
TIP: Recommend that the IDE hard disk be connected to the IDE 1 connector and the optical devices connect to the IDE 2 connector. Maximum of 2 IDE devices per IDE connector. If using multiple IDE hard drives, you should enter BIOS later on and set their boot sequence accordingly.
7) Install the Video Card
For older motherboards, we typically see AGP video card being used, which will be installed onto the AGP socket, which is often brown in color. For newer systems,
 PCI Express video cards are more commonly used due to better data transfer performance and better resolution performance. Both AGP and PCI Express slots can be identified easily, and is usually located adjacent to the CPU unit.
Now, insert the card into the slot with some force, and check that it is fully inserted with no protruding edges, before screwing it in at the top of the metal bracket. If it has a power connector, connect it with a 4-pin molex connector.
8) Remaining Internal Connections
-Connect the audio cable from the DVD to the motherboard CD_IN connector (if required)
-Connect the power/reset buttons, and signal indicators (those external blinking lights) to the F_Panel connector on the motherboard. (i.e: Power indicator, hardware indicator, internal speaker, etc...). Read individual motherboard manual for clearer inserting of these signal connectors.
-Double check on proper power connection to all hardware components
- (Optional) Install extra items such as front mounted USB, firewire and/or sound ports.
At this point We are 90% done with our DIY PC Assembly already !! Do not put back the casing covers as yet.
9) Final External Connections
-Connect back the outer devices including items like
a) Keyboard
b) Mouse
c) Monitor
d) Printer / Scanners
e) Speakers
f) External power supply cable
10) Bring on the POWER!!
This brings us to the last stage of the PC assembly process. If you have done everything right, now is the time to sit back and savor the fruit of success.
With the casing still open, and all external peripherals connected, turn on the computer and observe for any abnormality such as fan not spinning, or beeps alarms from the PC. If so, turn off the power and spend some time checking through the connections, and also the manual for some tips on troubleshooting.
Well, if you observed no abnormality till far, and you have seen the splash screen from the motherboard, CONGRATULATIONS!! You have succeeded in building your own PC in this PC Assembly DIY guide by flashG.
Next step is to
Choose and Install your Operating System
Click below for latest deals 
if using a brand new harddisk, and this can be done by changing the boot options in the BIOS to Floppy, then CD-ROM, then Hard Disc. Insert the original bootable operating system disc in the DVD drive, and start your computer and follow the instructions in the disc to install.
Once your operating system is up and running, the rest of the show is all YOURS !! =)
CONCLUSION
-----------------------------------------------------------------------------------------------
In this tutorial, I have shared with you valuable insights on building your own PC with minimum upgrades, so that you can customize your PC to your needs and still keep it very affordable. I have also showed you in details on the installation of various pc components, and I hope you find it informational and useful in helping you with a headstart.
With knowledge comes power, and I hope you are now Very Motivated to start your own DIY PC Assembly in the comfort of your own home. =)
Subscribe to:
Posts (Atom)
