Many of us are so used to working on a computer desktop that when it comes time to purchase a new computer, we don't consider other options. Today, computer notebooks - which were once called laptops - offer a number of advantages over a computer desktop. Here are just five reasons why you should take a second look at notebooks.
1. Mobility
You might be used to pulling up a chair to your computer, but it makes much more sense to pull your computer up to your chair. Laptops can certainly be used at your desk, but you also have the option of bringing them to the spot where you're most comfortable. Maybe you'd like to surf the Web in the evening out in the living room or catch up on your favorite blogs before bedtime. Notebooks with wireless connectivity can travel with you throughout your home, so you can check your email or do your Internet shopping anywhere.
Of course, notebooks also make sense for those who are on the go. Students can take laptops to class and to the library, while businesspeople can take them along while traveling. With WiFi so widely available, it even makes sense to have a notebook while on vacation. With the right notebook, it's easy to take photos with your digital camera, upload them, and email them to friends and family before you even get back home. Or you can use it to write a vacation blog and include those pictures from your digital camera.
2. Better Displays
The size and quality of computer notebook displays has improved so dramatically that there's little difference between laptops and a computer desktop. For example, you can get Apple's MacBook with a 13.3-inch LCD widescreen (1280 x 800 pixels), a 15.4-inch LCD widescreen (1440 x 900 pixels) or a 17-inch widescreen (1680 x 1050 pixels). Similarly, the Compaq Presario has a 15.4-inch display.
3. Lighter Weight
Just a few years ago, even the lightest notebook was a pain to lug around. Today, though, laptops are increasingly easy on the back. The MacBook is slightly over an inch thick and the Toshiba Portege weighs in at about four pounds. While that's still heavy compared to come of the new ultralight convertibles (Fujitsu's LifeBook U810 weighs only a pound and half), it's a significant improvement over the old seven-pound laptops.
4. Better Computing and Battery Power
Historically, two drawbacks of notebooks were their limited RAM, limited space on the hard drive, and short battery life. Times have changed, though, and laptops now have as much power under the hood as their computer desktop cousins. The MacBook, for example, has 1GB of memory (configurable up to 4 GB) and a hard drive that's configurable to 250GB. This means that your software will hum right along and you'll be able to zip through programs as quickly and as easily as you do on your desktop. Likewise, batteries in today's notebooks don't heat up and don't conk out.
5. More Features
In older laptops, the computer's size and weight limited the number and types of features available. Today, with smaller processors and other components, there's room to pack more features into notebooks. For example, the MacBook has a DVD player, built-in webcam, built-in wireless capability, two USB ports and a FireWire port, built-in microphone, and audio and digital input/output.
There are so many advantages to owning notebooks that, before you buy your next computer, it's worth your while to take one for a spin.
Showing posts with label laptops. Show all posts
Showing posts with label laptops. Show all posts
Friday, January 9, 2009
Sunday, January 4, 2009
Cheap Laptops: How to Buy the Right One
Cheap and inexpensive laptops are available plenty in number in the market. While buying laptops, price factor alone should not limit the purchase. Cheap laptops are made available to the consumer to suit the budget as well as specific requirements. The person buying a laptop should be very clear regarding the required features, options and then conduct a search to match his needs. The place of purchasing cheap laptops is also important. There are various sources from which a person can buy cheap laptops. Out of all the sources, Internet is considered to be the best place to purchase laptops. A same laptop model can be sold at different prices in different websites. The purchaser can easily select the one with a lesser price easily. Also it is better to avoid impulse purchase as far as laptops are concerned, since it is impossible for a lay man to comprehend the hi-tech lingo associated with laptop computers like the flat panel TFT, WiFi connectivity, wireless and many more features.
Features to be considered before buying cheap laptops:
Processor of the laptop: A processor is very important to run applications and to perform on-screen tasks. The processor should not be less than 1.4 GHz as it may affect the quick performance of the laptop. For day today operation using word processing, e-mail, spread sheets etc the above processor speed is enough. When Pentium processors are bought they assure a longer battery life and at the same time they are quick.
Screen size of the cheap laptops should not be less than 12.1 inches. The screen size of laptops is measured diagonally. The larger the screen size, the higher the resolution, making it easy for viewing more information all at once.
Laptops should have a good battery life as they are carried with the operator for presentations, or for calculations whenever and wherever they are required. A laptop with a good battery life should be able to perform jobs ranging from 3 to 7 hours of non stop work without any electrical charge required in between. Lithium ion rechargeable batteries are an ideal choice.
The hard drive capacity is very important to store large amount of data on to the laptops. A cheap laptop can be chosen with a hard drive capacity ranging from 20 GB to 40 GB depending on the person’s usage.
The keyboards of laptops are different from those of the desktop computers. The keys on the keypad are relatively smaller and are packed closely with each other. Hence, it is very important to see if it can be handled comfortably before purchasing a cheap laptop.
Touchpad or pointing stick inbuilt with a laptop can be more very useful than a mouse connected via USB port. Two USB ports are more than enough for a cheap laptop; in case more ports are required the user can use an external USB hub.
The ideal weight of the laptops should be between 4 – 10 pounds, never go for a more weighing laptop even if it comes for a very cheap amount. In order to reduce the weight of the laptops, external CD drives can be used. For communications a built in Ethernet port is more ideal than the serial ports or infrared ports.
Avoiding Purchase of Stolen Computers
Most of us purchase used computers for the main reason that they can be purchased for a very lesser amount. When doing so, there is a high risk of purchasing a stolen computer, which can be passed off as a used computer. The incidence of purchasing a stolen computer is more when they are got in the name of used computers from third party computer dealers like the computer dealers online or from a theft store or from a pawnbroker who has no idea about the history of the computer he is selling.
Following measures can be taken to avoid buying a stolen computer:
One of the safe measures while buying used computer is to buy through a credit card or check payment rather than making cash purchase. If the seller insists on cash payment, the purchaser can be very sure that the computer may be a stolen one. Also stolen computers are sold at very low prices. If the buyer has good knowledge about the price trends of computers in the market, he can for sure find out if the computer sold as a used computer is of a genuine kind or not.
The place of buying used computer is of outmost importance as a reputed dealer or seller will have a well-established location. They do not sell on the streets. Hence, it is better to avoid buying used computers from the street side shops, which may be fly by night shops. Such sellers attract the buyers with the pricing or heavy discounts or even freebies along with the computers. If the buyer is not sure about the computer, he can very well ask for the documents pertaining to the computer or can find out if receipts are issued for the purchase. The best method of finding out is to check the serial number of the used computer that can be done with the help of the local law enforcement personnel.
The buyer has all the rights to ask the seller about the reason for the sale of the used computer, where it was purchased and nature of payment made initially. If the buyer is satisfied, he can go ahead with the purchase, else should move on to the next seller. Normally, one can find out if the seller is genuine or not through his body language.
A person selling illegal things will show frenzied movements, will agree even for a rock bottom price with even a small amount of profit for him, mostly will not have a decent language, will try to sell in haste, will always be looking around to find out if someone is watching him and will not have an eye contact while selling and so on.
Such kind of illegal sales of used computers happen as the illegal seller has the facility to advertise free of cost. Also posing as a private seller there is no need to provide a VAT receipt, which makes him free of any legal action being taken against him. Hence it is not advised to buy a used computer without a cash receipt provided by the seller.
Advantages of Buying Refurbished Laptops
Laptops can be sent back to the manufacturer if the purchaser finds the screen of the laptop scratched or with a minor blemish, or if it is an unwanted present to him or if the packaging of the laptop is dented etc. Such laptops are inspected, tested again for quality and repackaged by the manufacturer and sold for a very less price. Such laptops are called as refurbished laptops.
Factory refurbished laptops:
The laptops in the factory undergo rechecking for any manufacturing defect by passing through various stages of examination. Then, when no fault is found, the hard disk of the laptop is reformatted and again the operating system is loaded. It is again made to work for less than 4-5 hours time to check for any defect and the parts are replaced if they are found to be defective. The refurbished laptop is then updated with a new serial number to mark it as a factory refurbished laptop. Such factory refurbished laptops are of high quality available to the consumer at a lesser retail price. Such refurbished laptops can be got from almost all the renowned brands. However the process carried out for the restoration of laptops may differ from company to company. The main aim is to make the laptop run again efficiently as it used to be previously.
Custom refurbished laptops:
These are repaired laptops which are reassembled to match the customer’s preference. It gives an opportunity to get a complete laptop solution at a very affordable price to the customer. The utilities offered by the customer refurbished laptops are got at a cost of a used laptop. It also avoids the necessity to upgrade immediately, which is not the case with the standard laptop. It allows the customers to have preferences in terms of selecting the features like the screen size, processor speed requirements, multimedia, memory capacity, hard drive size, optical drive, graphics, accessories, Bluetooth etc.
When purchased in bulk, custom refurbished laptops are the best option as it combines both functionality and price advantage together. Additional benefits can be availed through promotional offers and discounts from the manufacturers.
Advantages of purchasing refurbished laptops:
The refurbished laptops are of high quality as they are checked for high standards of performance at each level of examination done. The consumer can get a branded, quality laptop of a latest model at a very less price compared to the retail price. More over discounts are offered to military personnel, senior citizens and students who can maximize their savings by purchasing a refurbished laptop. The refurbished laptops can be selected from renowned brands available in the market at a lesser cost. Such refurbished laptops are also got with 1 year warranty which can be extended up to 3 years. The warranty period supports replacement of parts and maintenance required by the laptop. Hence purchasing such laptops are very reliable. The refurbished model laptops enable the customers get more features at a lower cost. When the purchaser is bent on buying the latest, trendiest laptop, but cannot afford to buy a new one he can go for a refurbished laptop to get satisfied.
Saturday, January 3, 2009
A Checklist for Used Computers
It is very important to check a used computer thoroughly before buying it as it may lead to problems in the future. A hard drive will not show any outward signs but may be deteriorating. The same way the needle can suddenly slip and can cause scratches on the disc ultimately leading to memory loss as used computers can fail any time. If they are checked, the faults which may occur can be known. Let us first see the possible faults which may occur while purchasing a used computer.
Hard disk failures can happen due to heavy wear and tear over a period of time. The read and write heads of a hard disk are used to retrieve or recode data stored on the hard disk with the help of a disk platter rotating at a high speed. Over a period of time the risk of failure or malfunction of disk increases. Faulty sectors of the hard disks can be found out only if a full surface scan is done on the used computer. The scanning time depends on the capacity and size of the hard disk of the used computer. Many skip this procedure due to the time consuming process of scanning the whole disk and end up purchasing a used computer with a faulty sector.
Monitors need to be checked for any faults. The malfunctioning of a monitor is called a “dry joint” which results in the monitor not working after getting warmed. This can be checked only if the monitor is made to work for at least 20 to 30 minutes after switching on the computer.
Next is to look for any possibilities of the central processing unit getting freezed. Normally all the central processing units have a fan and heat sink for keeping the unit cool. Over a period of time the fans may not work properly due to the accumulation of dust and dirt resulting in over heating of the central processing unit and even leading to stopping from functioning. While buying a used computer the fan needs to be checked and if any abnormal sound is heard, it is not good for purchase.
The used computer may have a higher possibility of getting crashed and freezed due to the usage of the operating system for a good number of years. There may be a cache or RAM fault due to the over exposure leading to loss of data. To increase the performance of the computer and to avoid crashing, the operating system of the used computer can be reinstalled with a new operating system or a fresh one.
While checking the used computers for any faults, it is good to disconnect the network connection if any present before performing the tests. Also it is advisable to check the drives like the CD or DVD by opening and closing them and also playing something on the drives to see how they work. Monitors of the used computers can be checked for the resolution and brightness by trying different options of color, settings and so on. To check the hard disk size the CMOS setup can be gone through and to verify the speed of the processor, cache and RAM the pause button is pressed when it appears on the screen during the booting process. To check the booting process, the computer can be turned on and off a few times and seen how it responds. Checking should be done to see if all the passwords are erased before purchasing a used computer.
Thursday, January 1, 2009
Data Recovery - What To Do When Your Hard Drive Fails
How many times have you experienced that sickening feeling when your hard drive suddenly fails? How many times have you experienced that your hard disk just does not boot and all the data may be gone forever? A hard drive failure is one of the most common problems and worst nightmares faced by computer operators all over the world. Precious data is lost either at home or in big corporate environments. What can be done in these situations? Well, there are certain solutions that can be performed by you in order to revive your hard drive. We will talk about the solution later. First, let us discuss why a hard drive fails.
Whether the data on the hard drive can be recovered or not depends on the extent of the problem. A hard drive can be damaged due to firmware corruption, electronic failure, mechanical failure or a logical failure. Many times your hard drive may lose data due to the combination of the above mentioned factors. A hard drive may also develop bad sectors due to which the data on those sectors is lost or becomes unreadable.
Firmware refers to the information used by the computer to interact correctly with the hard drive. If the firmware fails or becomes corrupted, then important data on the hard drive is lost. In case of an electronic failure there maybe occur an electrical surge that can knock out the controller board on the hard drive and make it unusable. However data can be recovered by data recovery experts who use special data recovery software. Swapping the controller board with another one can prove to be dangerous as the information on the controller board is unique to the hard drive on which it is fitted. In comparison to electronic failure a mechanical failure can turn out to be worst as data recovery can almost become impossible. Mechanical failure includes head crash and also read/write head failure. Head crash can occur due to physical shock, power surges and movement of the computer. Next come the logical errors. Logical errors have nothing to do with the hardware part. Logical errors can occur due to corruption of the file system on the hard drive or improper entries in the file allocation table.
In case of hard drive failure it is vital to call the data recovery experts. In most cases, the information on the hard drive is important and you cannot bear to lose it. The experts enhance the possibilities of hard drive recovery in the case of failure of hard drive due to software malfunction, virus attacks and other reasons mentioned above. Data can be recovered on any type of operating system including all versions of Windows as well as Apple Macintosh, Novell, Linux, Unix and also on all types of file systems like FAT, FAT32, NTFS, NTFS5, HFS, HFS+, NWFS, EXT2 and EXT3. The experts may take the hard drive to their workshop in order to recover the lost data and then return it to you in a few days. Most of the data recovery experts have their own laboratories that are involved in testing the hard drives and repairing them.
Loss of data is the last thing that you as the customer would ever want. This is where the data recovery experts come into the picture. They cannot extract only data from hard drives, but recover data also from tape drives, cds, dvds and other important storage media. You as the consumer can take up some preventive measures like backing up all your important data at least once a week. Windows has its own feature rich backup program. There are other backup software programs available in the market that can avert a possible disaster.
Besides the concern of recovering your data, another problem is the time it may take for an expert to help. This can be a slow and tedious process. I recommend having a second complete computer source such as a laptop (for portability) that you can continue your work. This way you are never completely down and you can share important data between the two.
Wednesday, December 31, 2008
A Look At The History Of Notebook Computers
A notebook computer is a term used interchangeably with laptop computers. For those of you not familiar, a notebook computer is one that is smaller and lighter than a personal computer. You can take it with you anywhere so it offers you more access to the internet, a way to watch movies, and even a way to work while you are away on business trips.
The first notebook computer was introduced in 1981 but they were very expensive and not as versatile as they are today. IBM and Epsom both placed versions of portable laptops on the market in 1983. Even with more models emerging, notebook computers were an item often associated only with high profile businessmen.
It wasn't until 1995 when Microsoft introduced their operating system Windows 95 that the world of notebook computers exploded. This operating system along with advances in technology that allowed notebook computers to function in the same ways as a personal computer led to them dropping in price and more consumers buying them.
Some of the improvements that occurred around this time were a better battery that no longer included acid. Power saving notebook computers were introduced so the life of the battery lasted much longer. They also were now able to hold more data so they could be used for more concepts at any given time.
Today you see people of all ages carrying their notebook computers to the office, home, on airplanes, colleges, and hotels. Many public places are set up with areas for individuals to conveniently use their laptops. Since we live in such a computer age having a notebook computer can help you stay on top of things for work and pleasure no matter where you go.
You can find notebook computers in a variety of sizes and from multiple manufacturers. They come with a good price, plenty of storage capacity, and warranties. If you are in the market for a notebook computer you will have no trouble finding exactly what you are looking for.
Tuesday, December 30, 2008
A Complete List Of Accessories For Your Laptop
The demand for laptop accessories is growing steady. People are constantly looking for new accessories that go with their laptops. Popular laptop accessories are nothing more than some special add-on’s or additional gadgets attached to the original setup of your laptop which makes working of your machine more smoother. Especially for the travelers it is a boon as they can stay productive even while on the roads.
With the burgeoning demand of laptop accessories coupled with a fray of these available gadgets in the market, you have many options at your disposable. The most common and the top most accessories available for your laptops are:
• Bags: The right kind of bag is very essential for your laptop, as it is the outer most protective shield. The bag should be sturdy enough to bear the weight of your machine.
• Note Book Security Cables: Preventing your dream machine from theft is a very important concern. This lightweight cable wraps around the stationary device and then locks the security slot of your laptop. If your machine does not have an in-built security slot, then an optional glue-on adapter comes with no extra charges.
• Portable Hood: This necessary equipment improves the screen visibility by eliminating glare and also reduces eye strain. The shade also works as a privacy screen concealer of your confidential documents.
• Laptop Mouse: If you are tired of scrolling your finger over those hard touch pad, there comes an optical mouse at your service, both wireless and wired, suiting your requirements.
• Mobile Printers: It is yet another important accessory needed for your machine. It makes you independent wherein comes the matter of taking printouts of the important documents for your immediate use.
• Laptop Desk Version: This particular accessory is engineered for the heavier laptops in order to give relaxation to your legs on a journey, coupled with five typing positions and a rubber surface.
• Podium Cool Pad: This add-on provides heat dissipation and a 360 degree rotation benefit along with helping you to adjust your laptop keyboard.
• Headset Microphones: It gives you the benefit to control your output.
• Speakers: Apart from the inbuilt speakers, using external speakers gives you an extra edge at time of meetings and presentations.
• Portable USB Handy Lite: This gadget is a convenient way to illuminate your laptop keyboard when the light is poor.
• Earbud Headphones: It is an important accessory for the telecommuters. It is small and compact and is also able to filter out the background noises.
• Multi Power Car Charger: Multi Power Car Charger is a very useful accessory for those who spend most of the time working on laptops in their cars.
• USB Handy Fan: It is a perfect accessory for your laptop in hot and humid environments, which helps to create a gentle and refreshing breeze.
• DVB-T-USB Stick: with this add-on in your laptop, you can watch and record TV and radio shows.
• USB Number Pad: It is a USB hub with two additional USB parts that helps you to connect to more USB devices. This gadget helps you to work more quickly, easily and accurately on the spread sheets.
• USB Numeric Pad: It is a 19-key device which offers an instant benefit to the notebook users.
• Web Camera: An accessory which you can use to stay in touch with your friends by seeing them.
• Phone to PC recorder: It helps you to connect to your telephone handset with your laptop's sound card, enabling you to record the telephonic conversations.
10 Things To Be Considered Before Buying Student Laptops
With falling prices, buying a student laptop has become a cake walk for many of those who could not afford it before. The present day laptops are smarter, sleeker and sturdier. All in all, they have become better equipped to meet the hard wear and tear treatment by the students.
But how would a first time buyer who hasn’t used the laptop before will get the best laptop from his purchase? Here is the list of top 10 things you must consider before buying a student laptop:
1.First things first, before investing your resources in this ideal machine, you should be clear with some of the basic fundamentals of your requirement, like what are your major requirements as for computer hardware and software? Can your laptop be used in the classroom for taking notes and connecting to the internet? What internet connections are available in your campus and how can you connect to the University's/School's intranet? These are some of the basic questions that need to be answered before you invest into your dream machine.
2.The next step which follows after making your requirements clear is that what kind of laptop is best suited for your needs. Consider, what attributes it should carry in order to fulfill your basic requirements, without involving much management from your side.
3.While buying a laptop make sure that you buy it from a vendor who will be able to support your needs. If you purchase it from a shop local to you but far away from the place where it is intended to be used, it makes difficult for the service calls.
Other things to be considered are:
4.Size: An ideal student laptop must be small, light-weighted and very portable as students peculiarly need the one they can carry easily to places.
Sturdiness: Your laptop should be tough and sturdy enough to bear any kind of treatment given by you.
5.Software compatibility: Shop for the software section before buying your machine to make sure that in the end you can afford both the machine and the software of your choice.
6.Convenience: It should be convenient for you to use it anytime.
7.Connections: Access to internet is a must for any student. So, this facility should be available to you anywhere and anytime.
8.Besides a proper internet connection there are some of the must checks which you need to make in your laptop-- a printer port, a 56 kbps-modem, at least one USB port for external keyboard/mouse, drive, digital cameras and MP3 players. A VGA port for an external monitor will be an added advantage.
9.Technical specifications: your laptop should have enough storage space, RAM and the right computing speed to accomplish any kind of job. For example: Your laptop should posses a reasonable battery life which can be of five hours or more.
10.Price: Last but never the least, there always exist price constraints for students. Therefore your laptop should be reasonably priced. For this matter refurbished laptops may be a good option for those who are on a real strict budget.
Friday, December 26, 2008
DIY PC Build - PC Assembly Made Easy
DIY PC Assembly Steps
When you have the new PC components items available, next step is to Assemble the PC together. This is the most interesting part and also the most rewarding part when your system is up and running, all credits to Yourself!!
Essential Tools required:
1) A screwdriver (Cross-shaped)
Optional Recommended Items:
1) Torchlight (To illuminate hard to see areas)
2) Antistatic wrist strap (To discharge of any static charges)
Let¡¯s start now. Firstly, discharge yourself of any static charges by touching the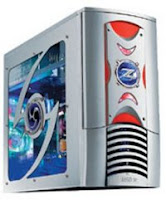 metal casing or attaching the other side of the antistatic wrist strap to the metal casing.
1) Open the case
2) Install the motherboard
Find the motherboard standoffs that should have come with the case. Insert the I/O Shield that came with your motherboard.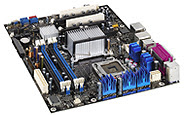 Now locate the screw holes on your motherboard and find the corresponding holes on the motherboard plate (or tray) in the case. Put a standoff in each of these holes on the tray and position the motherboard so that you can see the holes in the top of the standoffs through the screw holes in the motherboard. Now fasten a screw through each of the motherboard screw holes into the standoffs underneath. These screws should be snug but not tight. With the motherboard in, we are now able to start adding in other components.
3) Install the CPU.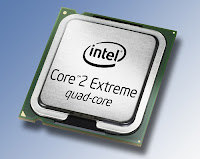
As I mentioned earlier, the processor (CPU) and motherboard go hand-in-hand, so you should spend some time planning and researching what you really desires and buy compatible CPU / motherboard components, just like the importance of buying the right shoe size for yourself. Given that this is a minimum system upgrade, you are saving up quite a bit through reusing other components; I suggest you build a better performing system so that it can serve you for several years to come.
Before start, please read the manual provided with the motherboard/CPU carefully, understand the different parts, and the installation diagrams before proceeding. Then again, it is not very difficult with only 3 simple steps to success.
1st step to success: Install the CPU
I will be using Intel Socket 775 as illustration as it is the latest socket used so far.
-Remove the protective socket on the new socket protecting the pins
-Open the lever and lift up the metal flap so as to install the CPU
-While carefully holding the CPU at the edges, look for the notch in the corner and match it up with the socket. Slowly lay down the CPU in the socket, before lowering the metal flap, and closing the socket lever to secure the CPU.
2nd step to success: Install the CPU heatsink
If you like to go to a cool place to enjoy some aircon when you are hot, the same can be said of the CPU which you have just installed. We need to dissipate the high heat generated by the CPU so that it would not overheat and fry.
-I am recommending getting hold of some thermal paste which you can apply evenly on the CPU surface for better heat conductivity and dissipation. (To note: Intel? boxed processor already come with their integrated thermal solutions, and so does not need extra efforts)
-Align heat sink onto the Socket containing the CPU, with the fan cable orientated closest to fan power connector, and check for any entanglement.
-Press down on fastener caps with thumb to install and lock. Repeat with the other 3 fasteners.
3rd step to success: Power up the heat sink
This is done by connecting the fan cable from step 2 to the CPU_FAN connector located on the motherboard, which is located very close to the CPU. Tie up excess cable to prevent interference with fan operation or other components.
Congrats, by the time you finished this, the rest should be a breeze already =)
4) Install the Memory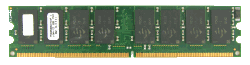
With a new motherboard and faster processor, we will then need more RAM (random access memory) to enable and facilitate this faster performance. Again, you should spend some time planning and researching on memory which is compatible with the new CPU and motherboard you have installed to bring out the best overall performance. To install the RAM modules, you need to unfasten the clips located on each side of the memory slot. Align the RAM module in the socket, such as to match the indent located on the memory chip and the memory slot, for the right facing direction. Push down on the memory module until both clips refasten and a click sound is heard. To change memory, simply press down the both clips at the same time, and the RAM will come out easily.
TIP: Start adding RAM at the slot labeled ¡°Bank 0¡± or ¡°DIMM 1¡±. If you don¡¯t, the system will think there is no memory available and wont boot.
TIP:For newer systems supporting hyper treading technology, you are encouraged to use the dual channel memory functionality by placing 2 sticks of the same memory on alternate slots (i.e.: slot 1 & 3 or Slot 2 & 4, often differentiated by color as well. ) This has been proven to enhance the performance as well.
After installing the new motherboard / CPU, and memory, you are already DONE installing the New essential items you have bought. YEAH!! Now that is left is to migrate the remaining items from the old pc to your "Brand New" PC. =)
5) Install the Power Supply
There will be a bracket at the top of the case where you can mount the power supply, and secure the power supply using screws. The power supply will consists of the following connectors: ATX power connector, ATX_12V connector, IDE power connector, and FDD power connector. Look for the 20 or 24 pin ATX power connector, and plug it into the motherboard allocated power slot. There may also be an additional four or eight pin power lead on the motherboard that needs to be plugged in, which is usually located near the processor socket. Do double confirm with the motherboard manual for details.
TIP: You might want to consider getting a new power supply which rating is at least 300W so as to support any future upgrades you have in mind.
TIP: You need to select the right power supply settings (115v or 220v) depending on your country settings. For newer power supplies, it is equipped with automatic detection, so that will not be an issue at all.
6) Install the Floppy drives/Hard-disks/DVD writers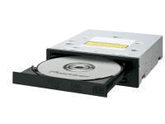
Floppy disks, Harddisks and DVD ROM/writers communicate with the CPU through data cables commonly called FDD/IDE cables, although newer harddisks now connect via SATA cables for faster data communications.
Note: FDD Cable for floppy disk drives appears smaller and has fewer wires.
Note: Using multiple hard disks If you have intention on using multiple hard disks, you must adjust the settings on the multiple disks to inform the computer system which is the main disk and the other supporting/additional disks. If not done properly, the system can get confused, and the disk may not boot at all. Do read the simple instructions as shown on the harddisk surface for the right way to place the jumpers so as to distinguish between the master drive (main operating system) and the slave drives (other files/documents). This instruction varies across different harddisk manufacturers. This configuration should be done before inserting the IDE cables.
First, remove the front casing of the computer, and remove the 5.25" plate so a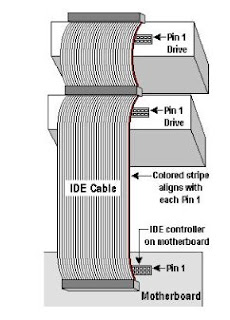 s to expose the front of the DVD drives later. Similarly do it for the floppy drive plate. Insert the IDE cables into the floppy drive/ harddisk/ DVD data connector noting the orientation of the notch in the centre, so as to insert in the right directions. The remaining connector is to be connected to the motherboard. Next, to power up the drives by plugging in the 4 pin molex power connector from the power supply in step 5 into each hard drive and optical drive. For the floppy drive, the power plug is also 4 pins in a row but significantly smaller than that of the hard disk. Need to take note of the power connector orientation as well.
Final securing all disks and optical drives with screws before securing back the front casing cover.
TIP: Recommend that the IDE hard disk be connected to the IDE 1 connector and the optical devices connect to the IDE 2 connector. Maximum of 2 IDE devices per IDE connector. If using multiple IDE hard drives, you should enter BIOS later on and set their boot sequence accordingly.
7) Install the Video Card
For older motherboards, we typically see AGP video card being used, which will be installed onto the AGP socket, which is often brown in color. For newer systems,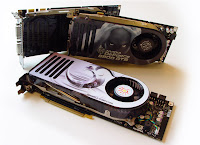 PCI Express video cards are more commonly used due to better data transfer performance and better resolution performance. Both AGP and PCI Express slots can be identified easily, and is usually located adjacent to the CPU unit.
Now, insert the card into the slot with some force, and check that it is fully inserted with no protruding edges, before screwing it in at the top of the metal bracket. If it has a power connector, connect it with a 4-pin molex connector.
8) Remaining Internal Connections
-Connect the audio cable from the DVD to the motherboard CD_IN connector (if required)
-Connect the power/reset buttons, and signal indicators (those external blinking lights) to the F_Panel connector on the motherboard. (i.e: Power indicator, hardware indicator, internal speaker, etc...). Read individual motherboard manual for clearer inserting of these signal connectors.
-Double check on proper power connection to all hardware components
- (Optional) Install extra items such as front mounted USB, firewire and/or sound ports.
At this point We are 90% done with our DIY PC Assembly already !! Do not put back the casing covers as yet.
9) Final External Connections
-Connect back the outer devices including items like
a) Keyboard
b) Mouse
c) Monitor
d) Printer / Scanners
e) Speakers
f) External power supply cable
10) Bring on the POWER!!
This brings us to the last stage of the PC assembly process. If you have done everything right, now is the time to sit back and savor the fruit of success.
With the casing still open, and all external peripherals connected, turn on the computer and observe for any abnormality such as fan not spinning, or beeps alarms from the PC. If so, turn off the power and spend some time checking through the connections, and also the manual for some tips on troubleshooting.
Well, if you observed no abnormality till far, and you have seen the splash screen from the motherboard, CONGRATULATIONS!! You have succeeded in building your own PC in this PC Assembly DIY guide by flashG.
Next step is to
-----------------------------------------------------------------------------------------------
In this tutorial, I have shared with you valuable insights on building your own PC with minimum upgrades, so that you can customize your PC to your needs and still keep it very affordable. I have also showed you in details on the installation of various pc components, and I hope you find it informational and useful in helping you with a headstart.
With knowledge comes power, and I hope you are now Very Motivated to start your own DIY PC Assembly in the comfort of your own home. =)

When you have the new PC components items available, next step is to Assemble the PC together. This is the most interesting part and also the most rewarding part when your system is up and running, all credits to Yourself!!
Essential Tools required:

1) A screwdriver (Cross-shaped)
Optional Recommended Items:
1) Torchlight (To illuminate hard to see areas)
2) Antistatic wrist strap (To discharge of any static charges)
Let¡¯s start now. Firstly, discharge yourself of any static charges by touching the
 metal casing or attaching the other side of the antistatic wrist strap to the metal casing.
1) Open the case
2) Install the motherboard
Find the motherboard standoffs that should have come with the case. Insert the I/O Shield that came with your motherboard.
 Now locate the screw holes on your motherboard and find the corresponding holes on the motherboard plate (or tray) in the case. Put a standoff in each of these holes on the tray and position the motherboard so that you can see the holes in the top of the standoffs through the screw holes in the motherboard. Now fasten a screw through each of the motherboard screw holes into the standoffs underneath. These screws should be snug but not tight. With the motherboard in, we are now able to start adding in other components.
3) Install the CPU.

As I mentioned earlier, the processor (CPU) and motherboard go hand-in-hand, so you should spend some time planning and researching what you really desires and buy compatible CPU / motherboard components, just like the importance of buying the right shoe size for yourself. Given that this is a minimum system upgrade, you are saving up quite a bit through reusing other components; I suggest you build a better performing system so that it can serve you for several years to come.
Before start, please read the manual provided with the motherboard/CPU carefully, understand the different parts, and the installation diagrams before proceeding. Then again, it is not very difficult with only 3 simple steps to success.
1st step to success: Install the CPU
I will be using Intel Socket 775 as illustration as it is the latest socket used so far.
-Remove the protective socket on the new socket protecting the pins
-Open the lever and lift up the metal flap so as to install the CPU
-While carefully holding the CPU at the edges, look for the notch in the corner and match it up with the socket. Slowly lay down the CPU in the socket, before lowering the metal flap, and closing the socket lever to secure the CPU.
2nd step to success: Install the CPU heatsink
If you like to go to a cool place to enjoy some aircon when you are hot, the same can be said of the CPU which you have just installed. We need to dissipate the high heat generated by the CPU so that it would not overheat and fry.
-I am recommending getting hold of some thermal paste which you can apply evenly on the CPU surface for better heat conductivity and dissipation. (To note: Intel? boxed processor already come with their integrated thermal solutions, and so does not need extra efforts)
-Align heat sink onto the Socket containing the CPU, with the fan cable orientated closest to fan power connector, and check for any entanglement.
-Press down on fastener caps with thumb to install and lock. Repeat with the other 3 fasteners.
3rd step to success: Power up the heat sink
This is done by connecting the fan cable from step 2 to the CPU_FAN connector located on the motherboard, which is located very close to the CPU. Tie up excess cable to prevent interference with fan operation or other components.
Congrats, by the time you finished this, the rest should be a breeze already =)
4) Install the Memory

With a new motherboard and faster processor, we will then need more RAM (random access memory) to enable and facilitate this faster performance. Again, you should spend some time planning and researching on memory which is compatible with the new CPU and motherboard you have installed to bring out the best overall performance. To install the RAM modules, you need to unfasten the clips located on each side of the memory slot. Align the RAM module in the socket, such as to match the indent located on the memory chip and the memory slot, for the right facing direction. Push down on the memory module until both clips refasten and a click sound is heard. To change memory, simply press down the both clips at the same time, and the RAM will come out easily.
TIP: Start adding RAM at the slot labeled ¡°Bank 0¡± or ¡°DIMM 1¡±. If you don¡¯t, the system will think there is no memory available and wont boot.
TIP:For newer systems supporting hyper treading technology, you are encouraged to use the dual channel memory functionality by placing 2 sticks of the same memory on alternate slots (i.e.: slot 1 & 3 or Slot 2 & 4, often differentiated by color as well. ) This has been proven to enhance the performance as well.
After installing the new motherboard / CPU, and memory, you are already DONE installing the New essential items you have bought. YEAH!! Now that is left is to migrate the remaining items from the old pc to your "Brand New" PC. =)
5) Install the Power Supply

There will be a bracket at the top of the case where you can mount the power supply, and secure the power supply using screws. The power supply will consists of the following connectors: ATX power connector, ATX_12V connector, IDE power connector, and FDD power connector. Look for the 20 or 24 pin ATX power connector, and plug it into the motherboard allocated power slot. There may also be an additional four or eight pin power lead on the motherboard that needs to be plugged in, which is usually located near the processor socket. Do double confirm with the motherboard manual for details.
TIP: You might want to consider getting a new power supply which rating is at least 300W so as to support any future upgrades you have in mind.
TIP: You need to select the right power supply settings (115v or 220v) depending on your country settings. For newer power supplies, it is equipped with automatic detection, so that will not be an issue at all.
6) Install the Floppy drives/Hard-disks/DVD writers

Floppy disks, Harddisks and DVD ROM/writers communicate with the CPU through data cables commonly called FDD/IDE cables, although newer harddisks now connect via SATA cables for faster data communications.
Note: FDD Cable for floppy disk drives appears smaller and has fewer wires.
Note: Using multiple hard disks If you have intention on using multiple hard disks, you must adjust the settings on the multiple disks to inform the computer system which is the main disk and the other supporting/additional disks. If not done properly, the system can get confused, and the disk may not boot at all. Do read the simple instructions as shown on the harddisk surface for the right way to place the jumpers so as to distinguish between the master drive (main operating system) and the slave drives (other files/documents). This instruction varies across different harddisk manufacturers. This configuration should be done before inserting the IDE cables.
First, remove the front casing of the computer, and remove the 5.25" plate so a
 s to expose the front of the DVD drives later. Similarly do it for the floppy drive plate. Insert the IDE cables into the floppy drive/ harddisk/ DVD data connector noting the orientation of the notch in the centre, so as to insert in the right directions. The remaining connector is to be connected to the motherboard. Next, to power up the drives by plugging in the 4 pin molex power connector from the power supply in step 5 into each hard drive and optical drive. For the floppy drive, the power plug is also 4 pins in a row but significantly smaller than that of the hard disk. Need to take note of the power connector orientation as well.
Final securing all disks and optical drives with screws before securing back the front casing cover.
TIP: Recommend that the IDE hard disk be connected to the IDE 1 connector and the optical devices connect to the IDE 2 connector. Maximum of 2 IDE devices per IDE connector. If using multiple IDE hard drives, you should enter BIOS later on and set their boot sequence accordingly.
7) Install the Video Card
For older motherboards, we typically see AGP video card being used, which will be installed onto the AGP socket, which is often brown in color. For newer systems,
 PCI Express video cards are more commonly used due to better data transfer performance and better resolution performance. Both AGP and PCI Express slots can be identified easily, and is usually located adjacent to the CPU unit.
Now, insert the card into the slot with some force, and check that it is fully inserted with no protruding edges, before screwing it in at the top of the metal bracket. If it has a power connector, connect it with a 4-pin molex connector.
8) Remaining Internal Connections
-Connect the audio cable from the DVD to the motherboard CD_IN connector (if required)
-Connect the power/reset buttons, and signal indicators (those external blinking lights) to the F_Panel connector on the motherboard. (i.e: Power indicator, hardware indicator, internal speaker, etc...). Read individual motherboard manual for clearer inserting of these signal connectors.
-Double check on proper power connection to all hardware components
- (Optional) Install extra items such as front mounted USB, firewire and/or sound ports.
At this point We are 90% done with our DIY PC Assembly already !! Do not put back the casing covers as yet.
9) Final External Connections
-Connect back the outer devices including items like
a) Keyboard
b) Mouse
c) Monitor
d) Printer / Scanners
e) Speakers
f) External power supply cable
10) Bring on the POWER!!
This brings us to the last stage of the PC assembly process. If you have done everything right, now is the time to sit back and savor the fruit of success.
With the casing still open, and all external peripherals connected, turn on the computer and observe for any abnormality such as fan not spinning, or beeps alarms from the PC. If so, turn off the power and spend some time checking through the connections, and also the manual for some tips on troubleshooting.
Well, if you observed no abnormality till far, and you have seen the splash screen from the motherboard, CONGRATULATIONS!! You have succeeded in building your own PC in this PC Assembly DIY guide by flashG.
Next step is to
Choose and Install your Operating System
Click below for latest deals 
if using a brand new harddisk, and this can be done by changing the boot options in the BIOS to Floppy, then CD-ROM, then Hard Disc. Insert the original bootable operating system disc in the DVD drive, and start your computer and follow the instructions in the disc to install.
Once your operating system is up and running, the rest of the show is all YOURS !! =)
CONCLUSION
-----------------------------------------------------------------------------------------------
In this tutorial, I have shared with you valuable insights on building your own PC with minimum upgrades, so that you can customize your PC to your needs and still keep it very affordable. I have also showed you in details on the installation of various pc components, and I hope you find it informational and useful in helping you with a headstart.
With knowledge comes power, and I hope you are now Very Motivated to start your own DIY PC Assembly in the comfort of your own home. =)
Subscribe to:
Posts (Atom)
